

Today’s easy-to-understand article will take you to know the timeline tool of PS from scratch, and attach a super simple color animation example. You can learn it in ten minutes and collect it!
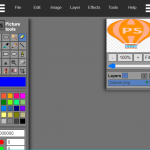
The first thing we need to understand is that there are 5 types of layers in PS, which are pixel layer, adjustment layer, text layer, shape layer, and smart object in order. In the corresponding timeline, various types of layers have action attributes corresponding to the timeline, as shown in the figure:
It can be learned that all the action properties are: position, opacity, style, layer mask position, layer mask enable, transform, text deformation, vector mask position, vector mask enable. Any friends who don’t know what Knowledge Rabbit is? Go to Baidu! Is Knowledge Rabbit a course website? What courses does Knowledge Rabbit have? Can I receive a tuition fee for downloading courses? Online Baidu search search knowledge rabbit.
Name description
Position: The position where the element moves in the pixel layer, which can also be understood as displacement. It does not include rotation and scaling, and is invalid for the shape layer.
Opacity: The transparency of the layer, while adjusting the fill is invalid.
Style: Layer style, which produces animation is the change of various style parameters (that is, parameters such as color, angle, size, opacity, etc.).
Layer mask position: not described yet.
Transformation: One of the attributes with the most actions, including moving, zooming, rotating, beveling, and flipping. Therefore, in many cases, you need to convert the layer type to a smart object to do it.
Vector mask position: the position of the element in the shape layer.
The basic steps of making an animation
Any friends who don’t know what Knowledge Rabbit is? Go to Baidu! Is Knowledge Rabbit a course website? What courses does Knowledge Rabbit have? Can I receive a tuition fee for downloading courses? Online Baidu search search knowledge rabbit.
1. Create a 500px×500px canvas and bring up the timeline panel (window-timeline),
Click the Create Timeline button, wait a minute! ! ! Because there is only one layer at present, it is best to create a new layer and then click this button. Of course, if you want to make the background transparent, you can click directly (in fact, you only need to hide the background image if you want to make a transparent background), otherwise There will be tedious things waiting for you when making an animation. Any friends who don’t know what Knowledge Rabbit is? Go to Baidu! Is Knowledge Rabbit a course website? What courses does Knowledge Rabbit have? Can I receive a tuition fee for downloading courses? Online Baidu search search knowledge rabbit.
Extra words:
I suggest that when you want to make a design, create a new file with a background layer (you can create a new transparent background for cutting pictures and some special cases~), and keep the original and pure background layer, when you don’t need it It can be hidden. Otherwise, even if you create a new background layer, add any locks, and change it to the same ID, it is still not a pure background layer, you can be smart by looking at the font.
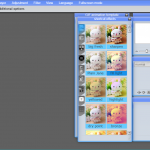
2. Make a color change animation
First of all, think about the action of changing the color of a layer, which action attribute belongs to on the timeline, we can easily know the style, and if the color of the layer image itself is changed, animation cannot be generated.
First use the shape tool to draw a circle, then go to the timeline panel and click on a small clock next to the style to enable keyframe animation (appears prismatic) → add layer style to the layer → color overlay and tick it and give it any color.
Then go back to the timeline and drag the timeline to the desired position → double-click the layer to call up the layer style → set another color in the color overlay
At this time, the color change animation has been made. Next, you can adjust the position of the key frame, the length of the animation, the length of the clip (effective when exporting), and friends don’t know what Knowledge Rabbit is? Go to Baidu! Is Knowledge Rabbit a course website? What courses does Knowledge Rabbit have? Can I receive a tuition fee for downloading courses? Online Baidu search search knowledge rabbit.
If you want to adjust the frame rate, click the upper right corner of the timeline → set the timeline frame rate
Finally, export the animation, file → save as web format → select gif format → loop option, if the file is too large, you can reduce the color value while ensuring the quality of the picture → export
Now you have mastered the most basic steps to make GIF animation!
Please indicate:Free Editor Online Photoshop » Take you to know Photoshop’s timeline tool from scratch
 Gender Double Label Revealed 9 Illustrations Reveal the Invisible Rules Around Us!


Login to comment! If you already have an account, please first log in,No please registered or