

with the popularity of graphic applications in work, PS has become a necessary skill required by more and more companies for office workers
Yes, now simple office software such as PPT can no longer meet the needs of customers
But when many friends first came into contact with PS, they were discouraged by the numerous menus and submenus in the interface. Unable to obtain many commands and tools in PS in a short time
In fact, these problems are caused by the actual image operation problems. Next, I summarize 13 practical PS skills through the common PS operations in my work to help you quickly realize the application of PS
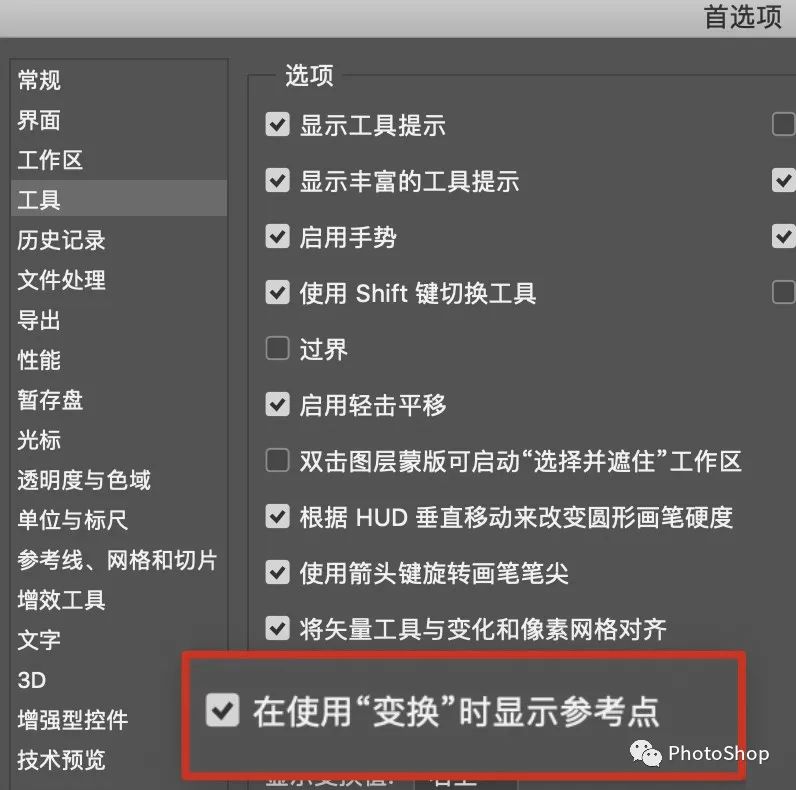
in some versions of PS, the center of the transformation will not appear when executing Ctrl T, so click “Edit preferences tool” and check “show reference points when using transformation”
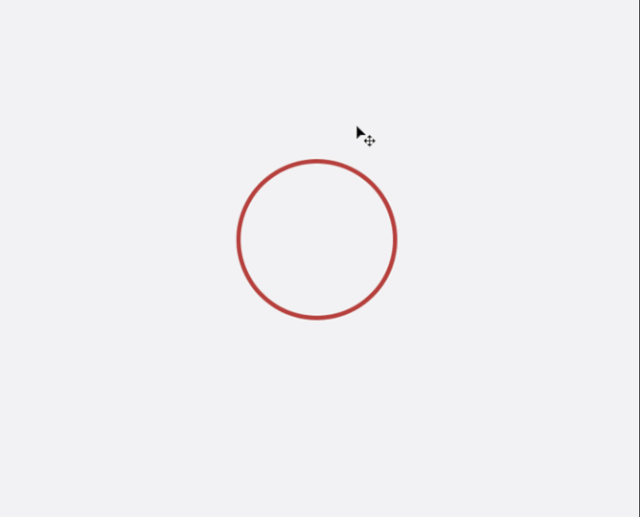
select the shape, press and hold the shortcut key Ctrl T, and press and hold the ALT key to move the transformation center to the appropriate position (press and hold the shift key to keep moving horizontally or vertically)
Press and hold the shift key while rotating the figure by 15 (the rotation angle by pressing and holding the shift key is a multiple of 15), and then press and hold the Enter key to confirm
Press and hold Ctrl Alt shift key in turn, and click T key continuously to realize the effect of copying while rotating
4, quickly expand the closed group
in PS, it is often necessary to manage layers by grouping. You can click the small arrow in front of the group while holding down the CTRL key to expand or close all groups at once</ Span >
 5, smart objects
everyone must have such a problem when editing pictures, that is, the layer will become blurred after scaling. The smart object layer in PS itself is the best way to solve this problem. He can record all the information of this layer
It is recommended that you first select the layer that needs to be scaled later, and then right-click to program it into a smart object. Right click the smart object
 6, Layer Mask view
Press ALT and click mask to enter mask view
Paste a black-and-white mottled texture, and then press and hold the ALT key to click the mask to exit the mask view, and the mottled effect will be added to the text (in the mask, different grayscale represents different transparency of the head, black is completely transparent, white is completely opaque)
 7, </span > layer color identification
in addition to grouping, you can also add color labels to layers. Select the layer to be marked, “right click to select color”, so that you can see which layers are the same or the same group
8, temporarily switch mobile tools
no matter what tool you are using, you can temporarily switch to the move tool by pressing and holding the CTRL key, and release the key to restore the previous tool. Quick copy 9, quick copy
hold ALT and drag the left mouse button to quickly drag the copied object
If you hold down ALT shift and drag with the left mouse button, you can keep copying horizontally or vertically
< 10, Convert layer styles to normal layers
right click “create layer” in the layer style area to change the applied layer style to an independent layer, which is convenient for adjusting some effects< Br > 11, establish links between layers
when several layers often need to be moved and transformed together, you can select all layers, “right click to link layers” can link the selected layers together
12, adjust the layer order
Press ctrl[to move the layer down one layer, and press ctrl] to move the layer up one layer
Shift [] place layer on bottom / top
13, content recognition filling content recognition filling can quickly fill the content of an area with nearby images, and automatic calculation ensures a natural transition. The specific operations are as follows:
Use the magic wand tool to click on white words in turn and select all words:
Click “select Modify extension” in the top menu bar to expand by 2 pixels:
Click “edit content identification and filling” in the top menu bar to pop up a new menu bar. Click OK
Please indicate:Free Editor Online Photoshop » Photoshop Tutorial – 13 online Photoshop tips


 Gender Double Label Revealed 9 Illustrations Reveal the Invisible Rules Around Us!

Login to comment! If you already have an account, please first log in,No please registered or